
How to Install Sensor Update (Sport Range Trailers)
(For Trailer Vin Numbers - 1288 to 1879).
Video Guide
Tools:
Number 8 allen key
Number 6 allen key
Two 13mm wrenches
17mm wrench
Sidecutters
Flat head screwdriver
Kit:
New sensor bracket
Mounting bolt
Metal sensor pad
Sensor extension wiring
Sleeve tubing
Chassis clips
Zip ties
This tutorial explains how to reset the sensor to its new location on the landing plate, which is located at the rear of the trailer.
You will be removing the sensor from its original position, fitting it into a new sensor bracket and mounting that bracket on the lifting arm landing plate with a new bolt. You will then set the sensor to ensure the trailer-raising-winch shuts off at the precise moment the trailer is fully raised.
The location of the original sensor (red circle) and the landing plate (yellow circle) are on the driver’s side of the trailer, as highlighted below.

The process
Step 1:
Prepare the trailer before starting by fully raising the trailer, latching the lifting arms, placing axle stands under the trailer and disconnecting the battery switch.
Step 2:
Locate the sensor and remove it using the number 6 allen key. The sensor is located under the chassis, on the driver's side of the trailer, near the rear wheel. Use the side cutters to cut the zip tie holding the sensor in place. Remove the sensor from its original bracket. Discard the bracket.


Step 4:
Fit the sensor bracket into position on the landing plate, and securely fasten using the new allen cap bolt, which is longer than the one you removed.


Step 5:
With the bracket in place, apply the metal sensor pad directly above where the sensor will mount. The position of this sensor pad is important, the pad must line up with the sensor.
Step 6:
Once the sensor bracket and metal sensor pad are in place, install the sensor in the bracket including it’s anti-vibration washer.


Step 7:
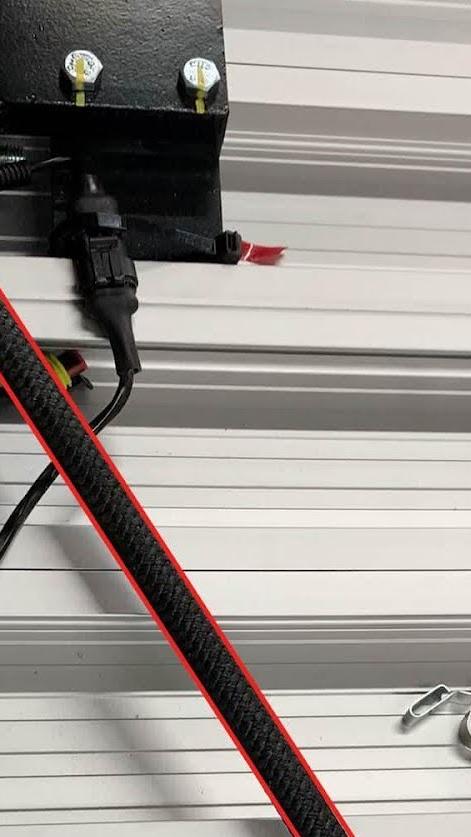
Plug the sensor extension wiring into the sensor, ensuring the wiring runs between the chassis and the lifting rope (highlighted by red lines in the picture below). Plug the other end of the wiring into the sensor port.
Step 8:
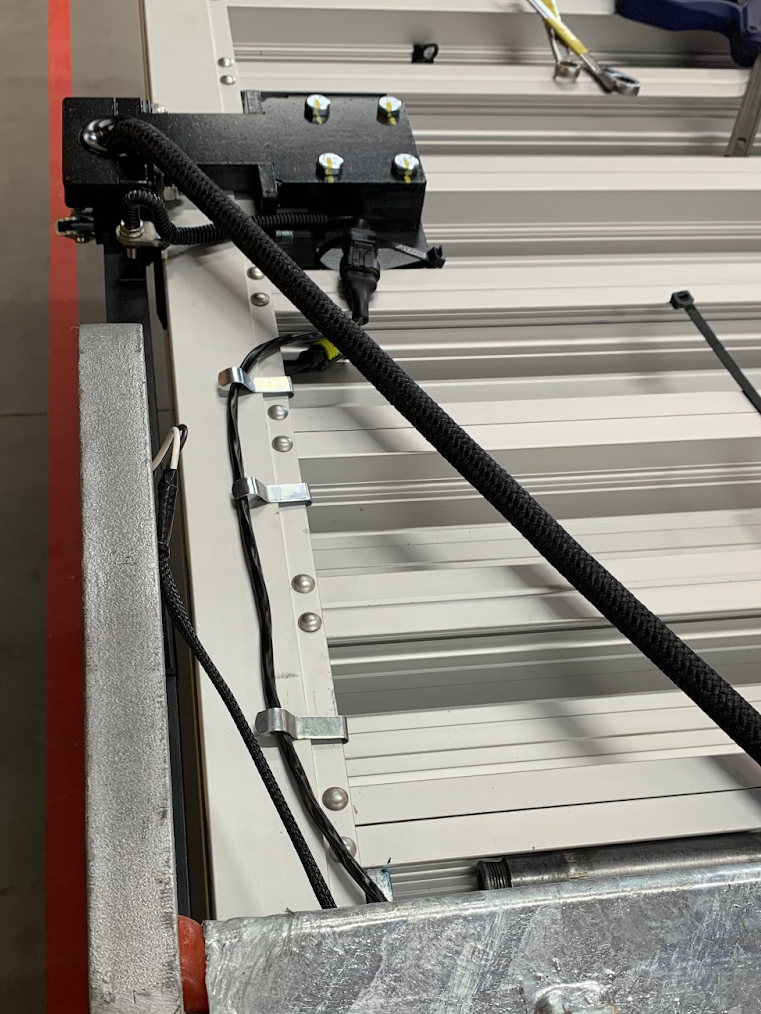
Position the corrugated split sleeve tubing around the sensor wiring and fasten with zip ties as pictured on the right, below.

Step 9:
Prise open the chassis body clips using the flat head screwdriver and use these to tidy up the sensor extension wiring by fastening it to the underside of the chassis.
Step 10:
Switch the battery switch on. Prepare to set the sensor by ensuring the trailer is fully raised, with no gap between the lifting arm and the landing plate, as indicated by the red line in the photo on the right, below. You may need to use a floor jack to raise the deck of the trailer causing the rear wheel to come off the ground slightly.

Step 11:
Position the sensor set low in the bracket and using the 13mm wrenches, raise it up by adjusting the lock nuts until the light just goes off.
When the sensor light goes off, the power to the trailer-raising-winch is cut off and the trailer stops raising. The sensor must be set so that the light goes off at the moment the lifting arms lands on the landing plate.


Other Resources
Loading articles